
Saturday, December 31, 2011
UNDER CONSTRUCTION
What is going on?!? Yep, messing with my blog.... but have to run.... it looks ridiculous -but what can I say? I am multi-tasking and dashing off to help a friend ready her home for the evening. :)
Wednesday, December 14, 2011
Edible Wreath -Really!
Tired of hot cocoa and S'mores? Wondering what to do with your left over, maybe even a little stale, marshmallows?

Make a wreath of course! Over at the Food Network you can see some other ideas too. I think the mini marshmallows really pop. We have so many half-eaten bags of marshmallows around here that I really need to crank one of these out... Don't want to leave my blog for fear of getting lost? No problem! The directions and guidance as given by the Food Network site are right here:
A Marshmallow World
While you’re picking up marshmallows for hot chocolate, buy a few extra bags to make this easy (30-minute!) winter-white wreath. Insert about 150 toothpicks halfway into a 12-inch flat foam wreath, then skewer a marshmallow onto each toothpick. Refrigerate overnight to set. (Birds may fancy this one, so consider hanging it inside.)
While you’re picking up marshmallows for hot chocolate, buy a few extra bags to make this easy (30-minute!) winter-white wreath. Insert about 150 toothpicks halfway into a 12-inch flat foam wreath, then skewer a marshmallow onto each toothpick. Refrigerate overnight to set. (Birds may fancy this one, so consider hanging it inside.)
Now go and find 150 toothpicks! Make sure to show me your creations. :)
Thanks for stopping by~
~Shelly
Thursday, December 8, 2011
Shabby Apple Winner!

Thank you so much for all of you who played along, making my contest a success. :)
~Shelly
Tuesday, December 6, 2011
DIY: You Just Might Need One of These!!
I have great news for you... have you seen this? It is a Must Have item! Created just last week from supplies that you surely have around your own home. Awesome Ashley brought it to life over at Make It and Love It.
 When you look closely, you can see that the holder fits snugly just under the plug. However, the opening does seem to have enough room to rest on top of the plug too -I imagine you will find which position works for you. I have not made mine yet, so I am just guessing here!! Just had to get this out there and give you time to make one, or two.... or three.... Be sure to head on over to Make It and Love It for the easy to follow, full tutorial!
Happy DIYing!
~Shelly

Happy DIYing!
~Shelly
Wednesday, November 23, 2011
Give-Away! Shabby Apple... WHAT?
This Give-Away is now closed.
"We started Shabby Apple because we saw a need in women’s fashion that was not being met. A need to make women feel feminine and beautiful for what they wear, not what they bare. We offer flirty, stylish dresses a woman can wear just as comfortably in the office, at a family dinner, or on a date."
Shabby Apple is giving me, ahem.. you the chance to win a dress! Here are a few I had to choose from:

Pineapple Prince

Nothin' Like a Dame

Waimea
And my choice for the Give-Away....
Be sure to check out their many other items -including necklaces;

Shoes;

And, oh, the swimsuits!

Ready to give it a go?
ENTRY RULES:
To enter this giveaway, you must:
1. Like Shabby Apple on Facebook, leave me a comment telling me you did so -by liking them you can get in on special promotions and exclusive discounts.
2. Visit ShabbyApple.com and comment on this post telling me your favorite item by Tuesday, December 6th at 11:59pm PST. You may enter up to 3 additional times by doing any of the following:
3. Follow or Subscribe to A Creative Space (blog)
4. Post a link to this giveaway on your Facebook page
5. Post a link to this giveaway on your blog
Leave separate comments letting me know which of the above you have done for each additional entry. Your comment(s) must include an email address to be eligible to win (either through your blogging ID or typed into your comment entry).
Due to Shabby Apple shipping requirements, this giveaway is open to readers with a US mailing address only. There will be no exchanges for the winning dress.
The winner will be chosen by random.org and announced on Wednesday, December 7th.
In a hurry to shop? Shabby Apple offers 10% just by signing up for email! You can enter their shop by using the link in my side bar.
Good luck everyone!
Linking up to: Debbiedoos
~Shelly
Thursday, November 17, 2011
What's In A Name?
Here is our little Peanut.
 He came to live with us when he was 2, and his name was, "Patches." People kept asking if he was a boy, or a girl, so we thought a gender-specific name would be a good idea. One day shortly after, we were on a family walk, and a man admiring our little ball of fur shouted out -"Hey, look at that little peanut!" We knew right away what his new name would be. Gender-specific be darned! That day our boys gave him his full name: Peanut Patches Jet-Fighter. Since he is part of our family, he has our same last name too -not, Jet-Fighter. In the interest of his privacy, we are keeping his last name out of this post. I just noticed..... look at the thin line of his mouth -doesn't he look like he is smiling? Besides his handsome self, he has a funny side too. You can check that out here!
Thanks for stopping by!
~Shelly
Linking to: Fabulously Flawed, Photo Challenge

Thanks for stopping by!
~Shelly
Linking to: Fabulously Flawed, Photo Challenge
Wednesday, November 16, 2011
Are you looking for Euphoria?
I am posting this recipe in honor of Monica. She is a friend of mine, who among other things, would rather be making cards, than hanging out in the kitchen. Or so she says.... My recipe books are always calling my name, so I sometimes find it hard to believe that everyone does not hear them. I guess Monica's cards shout louder! You can visit her here, and see the beautiful cards she creates. :)
 All of the ingredients and kitchen tools are pictured here. You can see that I set out the Almond butter, because I actually used almond butter. However, do not do this -it will be too sweet! Make sure to use peanut butter, as called for in the recipe. Well, maybe you could use the more sour granny smith apples to counteract the almond butter. I am pretty sure I used a Fuji apple and a Braeburn apple. (Might have used a Jonagold instead of the Braeburn...) Let's play a little reverse "I Spy" -can you see what is missing from the tools?
It has 1 or 2 sharp edges..., definitely a handle.....
Yep! An apple peeler/sharp knife! You need to discard the peels before you plop them into the crock pot.
 Mix everything together, and if it wasn't for the sweet smell -you would be convinced that you were making an Indian panner dish. Doesn't the caramels look like they could be cheese?


Your recipe awaits.....
Caramel-Apple Euphoria
Makes 7 Servings
INGREDIENTS
2 medium (5 to 6 oz. each)
1/2 cup apple juice
24 (about 7 oz.) caramel candy squares, unwrapped
1 teaspoon vanilla extract
1/8 teaspoon ground cardamom
1/2 teaspoon ground cinnamon
1/3 cup cream-style *peanut butter (*I prefer almond butter)
7 slices angel-food cake or 1 quart vanilla ice cream
DIRECTIONS
1. Peel, core and cut each apple into 18 wedges; set aside.
2. In 3-1/2 quart or smaller slow cooker, combine apple juice, unwrapped caramel candies,
vanilla, cardamom and cinnamon.
3. Drop peanut butter, 1 teaspoon at a time, over ingredients in slow cooker; stir.
4. Add apple wedges; cover and cook on LOW 5 hours.
5. Stir contents of slow cooker thoroughly; cover and cook on LOW 1 additional hour.
6. Serve approximately 1/3 cup of warm caramel-apple mixture over a slice of angel-food
cake or vanilla ice cream.

Recommendation from Mabel:
"Treat yourself to this people-pleasing dessert. Try substituting ripe peach for apples and 1/8 teaspoon almond extract for cardamom."
Because I care about your health, I chose this apple recipe to help you incorporate fruit into your diet.
Each healthy serving contains:
216 calories; 4g protein; 32g carbohydrates; 9g fat; 1mg cholesterol; 67mg sodium
If you would like to join up to the Sweet Swap -head over to my introduction post and sign up. The swapping is still going on! {Ends: Dec. 31, 2011}

It has 1 or 2 sharp edges..., definitely a handle.....
Yep! An apple peeler/sharp knife! You need to discard the peels before you plop them into the crock pot.


The directions call for you to slice each apple into18 wedges. My apple corer/slicer cuts fruit into 8 slices -so I cheat and cut those slices in half, only coming up with 16 slices each. Sorry if I am leading you down a dark path....

Ta da! Now go and do something fun for 5 hours. If you lose track of time while you are goofing around, the post-it note will help bring you back to reality.

When you remove the lid, you will feast your eyes on the mouth watering concoction that is, Caramel-Apple Euphoria.

You can serve it with ice cream (my favorite) or...

with angel food cake. OR, with whatever you like!
Your recipe awaits.....
Caramel-Apple Euphoria
Makes 7 Servings
INGREDIENTS
2 medium (5 to 6 oz. each)
1/2 cup apple juice
24 (about 7 oz.) caramel candy squares, unwrapped
1 teaspoon vanilla extract
1/8 teaspoon ground cardamom
1/2 teaspoon ground cinnamon
1/3 cup cream-style *peanut butter (*I prefer almond butter)
7 slices angel-food cake or 1 quart vanilla ice cream
DIRECTIONS
1. Peel, core and cut each apple into 18 wedges; set aside.
2. In 3-1/2 quart or smaller slow cooker, combine apple juice, unwrapped caramel candies,
vanilla, cardamom and cinnamon.
3. Drop peanut butter, 1 teaspoon at a time, over ingredients in slow cooker; stir.
4. Add apple wedges; cover and cook on LOW 5 hours.
5. Stir contents of slow cooker thoroughly; cover and cook on LOW 1 additional hour.
6. Serve approximately 1/3 cup of warm caramel-apple mixture over a slice of angel-food
cake or vanilla ice cream.
Source:
The Crockery Cook by Mabel Hoffman
Recommendation from Mabel:
"Treat yourself to this people-pleasing dessert. Try substituting ripe peach for apples and 1/8 teaspoon almond extract for cardamom."
Because I care about your health, I chose this apple recipe to help you incorporate fruit into your diet.
Each healthy serving contains:
216 calories; 4g protein; 32g carbohydrates; 9g fat; 1mg cholesterol; 67mg sodium
Tuesday, November 1, 2011
Get Ready -I'm Co-Hosting The SWEET SWAP!!
Hey there! Thinking about coming to the party? Excellent! I'm hosting this month's Sweet Swap along with Becca, Emily, Kate & Megan, of Crumbs and Chaos. They even have a recipe for Breakfast Cake -how can you go wrong starting off your day with cake? The Sweet Swap originated at Pressed Down & Shaken Together on October 1st and will be going strong until December 31st. Please try to visit at least 2 other guest posts -thank you! Also -linking up an old post is perfectly acceptable. Go HERE to find my post, linking up to the party! I am so excited to see your recipes and choose some for features!
Today, I am adding this recipe which is specifically for NOV 1ST -really! I found it in {The New Calendar of Desserts; 365 Answers to the Daily Question: What Shall We Have For Dessert?"} -Revised and Prepared by Elizabeth O. Hiller; circa 1920. Not a lot of explanation in this collection of recipes, but they are really fun. :) Today's suggestion:
Parisian Bread Pudding
Butter thin slices of bread and spread with raspberry jam, quince or apple jelly. Arrange them in qt. buttered pudding dish, lined with macaroons. Fill dish half full. Pour 1 qt. boiled custard and stream 1 hour. Remove from steamer, spread with meringue of whites - 2 eggs beaten stiff with 2 tbsps. sugar. Brown in oven. Serve hot with Hard or Foamy Sauce.
[If you figure out what "Hard or Foamy Sauce" is -please let me know!]

 ~Shelly
Today, I am adding this recipe which is specifically for NOV 1ST -really! I found it in {The New Calendar of Desserts; 365 Answers to the Daily Question: What Shall We Have For Dessert?"} -Revised and Prepared by Elizabeth O. Hiller; circa 1920. Not a lot of explanation in this collection of recipes, but they are really fun. :) Today's suggestion:
Parisian Bread Pudding
Butter thin slices of bread and spread with raspberry jam, quince or apple jelly. Arrange them in qt. buttered pudding dish, lined with macaroons. Fill dish half full. Pour 1 qt. boiled custard and stream 1 hour. Remove from steamer, spread with meringue of whites - 2 eggs beaten stiff with 2 tbsps. sugar. Brown in oven. Serve hot with Hard or Foamy Sauce.
[If you figure out what "Hard or Foamy Sauce" is -please let me know!]

I also love a good cup of Mexican Hot Chocolate. Tastes so wonderful on a cold night! You have to click on the picture (recipe card) to read the recipe. If you have trouble, just let me know. :)

Wednesday, October 26, 2011
Fall Luminaires
Our front steps are not lit very well. So, on each Halloween night, I like to find ways to keep them safe for the Trick-or-Treaters. A couple of years ago, not having planned ahead, I just lined up a few flash lights and called it good. That didn't work very well, as some of the little-tyke Trick-or-Treaters grabbed a flashlight for their travels... Last year, I used large canning jars filled with candy corn and tea lights. I made them early and kept them inside for a few weeks -smelled yummy! This year, I wanted to see what would be the more festive! The inspiration idea came from My Chic Life and her Boooo-minaries. I wish I would have thought of that name!
Here are all 4 that I experimented with~ Each has a submersible LED tea light

1. Cold water, orange food coloring. (1/2 drop red, if you can, to about 30 yellow drops.)
2. Cold water, neon green food coloring.
3. Orange Glow Stick bracelet.

I was in the back yard, so they are lined up on the deck steps. They will actually be placed on the front steps and walkway, where the porch light will be on. I am looking more for atmosphere here, and a little hint that you are going up a step. The jars without water were the brightest, but the least interesting.
Orange colored water


Here are all 4 that I experimented with~ Each has a submersible LED tea light

1. Cold water, orange food coloring. (1/2 drop red, if you can, to about 30 yellow drops.)
2. Cold water, neon green food coloring.
3. Orange Glow Stick bracelet.
4. Neon yellow Glow Stick tube, bend to activate, cut open and drizzle into the jar.

I was in the back yard, so they are lined up on the deck steps. They will actually be placed on the front steps and walkway, where the porch light will be on. I am looking more for atmosphere here, and a little hint that you are going up a step. The jars without water were the brightest, but the least interesting.
Orange colored water

It is more orange than this picture shows. Just take a look at the first pic, #1.

I like the green best. It looks murky here -a good effect to know about -but it won't last. It looks better clear, but I accidentally added warm water when I was topping it up and didn't want to wait for it to cool. I was figuring all this out while I was cooking dinner! You know how it is!

No water in this one. The fabulous LED light took all of the glow away from the stick. This would not do the trick at all.

No water in this one either. I cut off the end of a green/yellow glow stick and emptied it into the jar, rolling the jar around to coat the inside. I had not thought about cutting the stick open, and when I saw it here, it seemed like something fun to try. [It worked really well for Christina -not so well for me. Even when I took the LED light out.]

My favorite is the green. Which one do you like? I think I will try purple too -like the Booo-minaries!
Update: Well, sort of. I actually just saw a really fun Halloween Luminaire project. Less of the "glitzy-spooky" I was going for, and more of the goofy-fun type. You really need to go take a look. After, that is, you spend a bunch of time looking around here. I know you really can't help yourself. I can tell. Go take a look at Condo Blues' Solar Milk Jugs. Tell Lisa that I sent you! :)
Partying at:
~Shelly
Tuesday, October 25, 2011
Magazine Inspired Halloween Tags
You pick up a magazine because it has a fun cover, and teases you with yet another article about freeing yourself of clutter -then what happens? The cover happens to be your favorite part of the magazine! I am sure I liked the inside too, but to tell you the truth -I cannot remember much about the articles. Well, except that to make cake balls, you actually scrap the cake with a fork and mush it all up between your palms to form a ball. Might have been some icing mixed in there too -not sure.

This is what happens when the cover is more fun:
 You cut it out, and use it! For what? I thought you would never ask. To make tags, of course!
Take a bit of Elmer's glue & water, scissors, jar of water w/paintbrush, Polished Pigments "Pure Mica" from Lumin Arte, a good movie, and you are all set. Mix the glue & water (start with about 1/3 glue to 2/3 water) and add in the powdered pigment to a consistency that you desire. Desire, you didn't know that this was a sexy project too -did you?
Here are the tags that I came up with:

 Can you tell where my pages came from? What "type" of book? (Answer is at the bottom -unless I forget to tell you by the time I get to that bit!)


Most of the backs just had my paint mixture on them. This one has a bit of book page on it. Later I added Halloween themed ribbons to them, before I used them for Thank You's.


Wish I had kept one for myself -I could use it to keep my place in a very scary book....
Linking up to:
Halloween Haunt: Dream Home DIY
Get Your Craft On
Show Me What Ya Got
Make it Yours Day
Idea Sharing Wednesday
Whatever Goes Wednesday
Crafty Scrappy Happy
Answer: An Almanac.
Have a fantastic day, and thanks so much for stopping by!!
~Shelly

This is what happens when the cover is more fun:

Take a bit of Elmer's glue & water, scissors, jar of water w/paintbrush, Polished Pigments "Pure Mica" from Lumin Arte, a good movie, and you are all set. Mix the glue & water (start with about 1/3 glue to 2/3 water) and add in the powdered pigment to a consistency that you desire. Desire, you didn't know that this was a sexy project too -did you?
Here are the tags that I came up with:


Most of the backs just had my paint mixture on them. This one has a bit of book page on it. Later I added Halloween themed ribbons to them, before I used them for Thank You's.

All in a row~

Wish I had kept one for myself -I could use it to keep my place in a very scary book....
Linking up to:
Halloween Haunt: Dream Home DIY
Get Your Craft On
Show Me What Ya Got
Make it Yours Day
Idea Sharing Wednesday
Whatever Goes Wednesday
Crafty Scrappy Happy
Answer: An Almanac.
Have a fantastic day, and thanks so much for stopping by!!
~Shelly
Tuesday, October 11, 2011
10 Minute Owl Decor

Oh say, some of you may possibly have viewed yesterday's posting by the Graphics Fairy. But just a few -she's not really that well known. So, you probably do not know about her Brag Monday either. :)
GF mentioned Suzanne's of WhyCuzICan, BOO to You Project, created with the above owl image. It is very cool, sheet music and all! Inspiration found.
I decided to give it a quick try on some scrapbook paper. Although I do have several pads of paper, I could only find one at the moment, I think the paper suits Mr. Owl very well! If you look closely at the image, you can see that a couple of the dots landed in his eyes -not a look I was going for. And, since I could not find my mini punch either - I used the Martha Stewart Lady Bug punch to punch out solid green circles to cover the brown dots. You do not really notice the cover up as you walk by. Some will say it is an intended effect, I will go along with that.

I started out with a wooden silver frame and rubbed on some black craft paint, wiping off the excess. Easy stuff.

Embellish with a few bats, and that's it!

Need some more owl inspiration? How about popping over to visit Cute Polish and find out how to create an owl that you can take with you everywhere and that matches my paper!

Remember to stop by the on-going Holiday Sweet Swap. I will be co-hosting in November!
Linking up to: Debbiedoos & Graphics Fairy
Thanks for stopping bye~
See you soon!
~Shelly
Wednesday, September 28, 2011
Holiday Sweet Swap

THIS SATURDAY, OCT. 1st and lasting all the way through December!! Official party time is October 1st - December 31st, plenty of time to showcase your finest sweet treats. Our fabulous hostess is Keri, over at Pressed Down, Shaken Together.

Keri has several Hostesses, and I will be one of them! I am hosting for the month of November. Maybe, just maybe, some of those pumpkins I planted will be ready. A girl can dream.
Add your seasonal holiday treats -old and new posts are welcome!
You can join the party fun now.. get ready to hang out in the kitchen!
Sweet Swap Linky Party
Thursday, September 22, 2011
Free Fall Recipe Cards
HP (Hewlett-Packard) is here to help you out. Each project, uses their software backgrounds, your words and photos. Adding a photo is not required. Some projects high lighted are: Fall Inspired Recipe Cards; Autumn Word Scramble (use view to enlarge and check it out); Family Newsletter (not really a Fall theme); and, Creative Studio for the Home to see ALL of their choices. You can sort by Project Type, Project By Brand, Themes and Occasions and Tips, Learn & Share.
This is what MS does in her spare time... Martha Stewart Egg Cozies!

I tried out the Fall recipe card. Really simple, since I already had this recipe in a word doc. I just used cut-n-paste, easy-peasy. And since I did not have a tempting aromatic cup of cocoa to enjoy a photo shoot with, I relied on Google and found a photo here. Mine would have looked just as tempting -don't you think?
I think the Fall colors go perfectly with a steaming cup of Mexican Hot Cocoa... Yum!

Tell me about your creations, what did you come up with? To see my other HP projects go HERE.
Linking up to: Somewhat Simple, Crafty, Scrappy, Happy, Gluesticks, Fireflies & Jellybeans, While He Was Napping, Polly Want A Crafter, Tales From Bloggeritaville, Delightful Order, Finding Fabulous, Creation Corner, Fun To Craft, French Country Cottage, Stuff and Nonsense, Fingerprints on the Fridge
Enjoy!
~Shelly
Thursday, September 15, 2011
October Is On It's Way~ Let's make some cards!
Since I haven't done anything Fall-ish around the house... yet, I dug out the ole card making supplies and came up with a couple of Halloween themed cards.

After I cut and scored the cardstock, I punched out a circle for the moon in orange and colored it with a yellow chalk marker. I placed the front of the card in the embossing folder, gently closing it and moving the moon around until I decided where I liked it best and lightly glued it to the front. Some beginners might not realize... what to do with that pesky back side of the card when you are embossing? Just fold it around the back side of the folder, and slide it on through your machine. Really. I used to be a beginner, I should know.
Inking up the raised/embossed tree, makes the moon look like it is behind it. Magic. My original idea, I am sure of it.
I had intended to use my spider web embossing folder, like this one...
 however, it has gone missing -jumped right out of my binder. Hence the tree!
Some close ups of my first try~


 Just a tiny peak of the inside too. I should probably add a sentiment.
Supplies used:
Stampin Up!: Dark and Dreary cling stamp set (2010) and Crumb Cake cardstock
Sycamore embossing folder, Craft Concepts
Chalk Ink, Wet Wipe marker, yellow (color name not specified on marker)
Ribbon from Michael's Crafts
Circle punch, 1.25 inch; Xyron -Create-a-Sticker; Crop-A-Dile corner rounder; Score Pal
Ink: Memories Chalk Ink, Creamy Coffee
Brilliance, Graphite Black
Versafine, Vintage Sepia


Supplies used:
Stampin Up!: Howl-o-ween Creeps & Spooky Bingo Bits cling Stamp sets (2011); Crumb Cake cardstock
Sycamore embossing folder, Craft Concepts
Chalk Ink -Wet Wipe marker, yellow (color name not specified on marker)
Ribbon from Michael's Crafts
Circle punch, 1.5 inch; Xyron -Create-a-Sticker; Crop-A-Dile corner rounder; Scor-Pal
Ink: Memories Chalk Ink, Creamy Coffee
Brillance, Graphite Black
Versafine, Vintage Sepia
If you would like one of these cards -just send me your address and I will pop it (mailing envelope included) in the mail to you -just let me know which one you would like. I only made 2, so supplies are scary! (You know I mean scarce, right? :)
Thanks for stoppin' by!
~Shelly

After I cut and scored the cardstock, I punched out a circle for the moon in orange and colored it with a yellow chalk marker. I placed the front of the card in the embossing folder, gently closing it and moving the moon around until I decided where I liked it best and lightly glued it to the front. Some beginners might not realize... what to do with that pesky back side of the card when you are embossing? Just fold it around the back side of the folder, and slide it on through your machine. Really. I used to be a beginner, I should know.
Inking up the raised/embossed tree, makes the moon look like it is behind it. Magic. My original idea, I am sure of it.
I had intended to use my spider web embossing folder, like this one...
Some close ups of my first try~


You get extra points if you noticed the piece of lint on my owl. How on earth did that get there?


Supplies used:
Stampin Up!: Dark and Dreary cling stamp set (2010) and Crumb Cake cardstock
Sycamore embossing folder, Craft Concepts
Chalk Ink, Wet Wipe marker, yellow (color name not specified on marker)
Ribbon from Michael's Crafts
Circle punch, 1.25 inch; Xyron -Create-a-Sticker; Crop-A-Dile corner rounder; Score Pal
Ink: Memories Chalk Ink, Creamy Coffee
Brilliance, Graphite Black
Versafine, Vintage Sepia
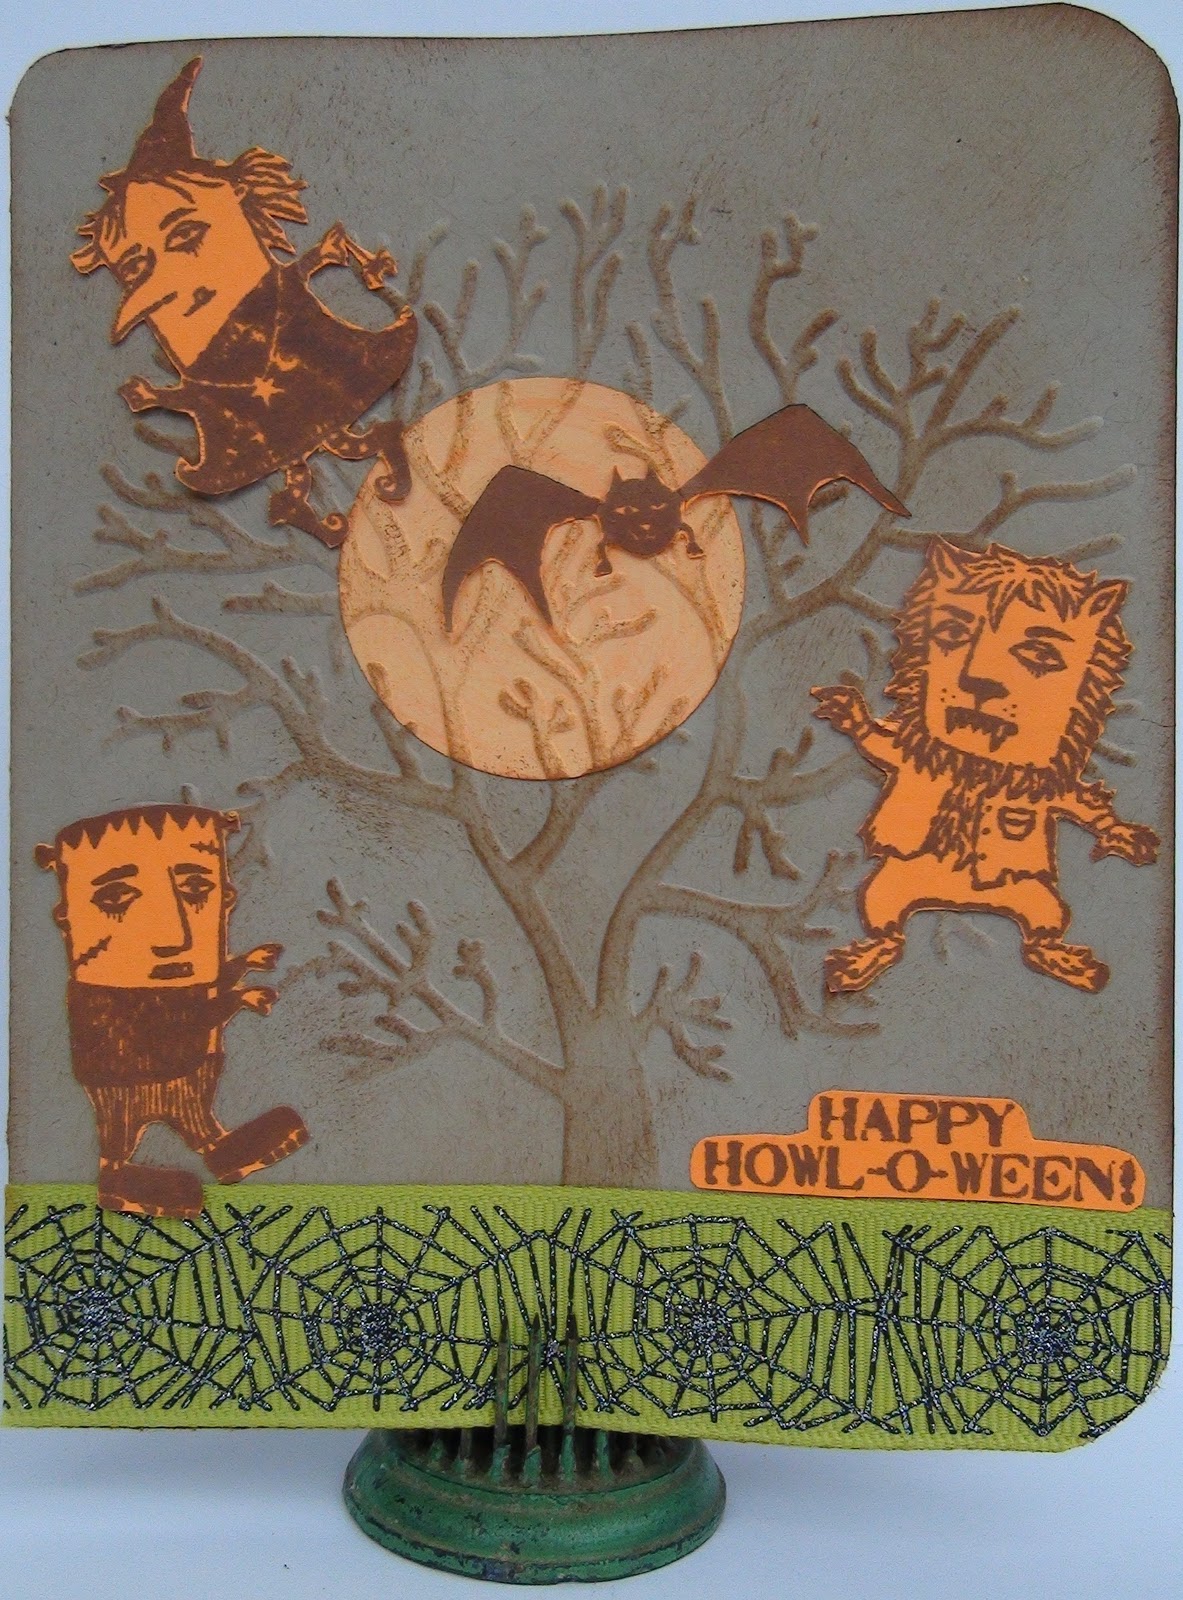
And this is what I came up with on my second try:


Supplies used:
Stampin Up!: Howl-o-ween Creeps & Spooky Bingo Bits cling Stamp sets (2011); Crumb Cake cardstock
Sycamore embossing folder, Craft Concepts
Chalk Ink -Wet Wipe marker, yellow (color name not specified on marker)
Ribbon from Michael's Crafts
Circle punch, 1.5 inch; Xyron -Create-a-Sticker; Crop-A-Dile corner rounder; Scor-Pal
Ink: Memories Chalk Ink, Creamy Coffee
Brillance, Graphite Black
Versafine, Vintage Sepia
If you would like one of these cards -just send me your address and I will pop it (mailing envelope included) in the mail to you -just let me know which one you would like. I only made 2, so supplies are scary! (You know I mean scarce, right? :)
Thanks for stoppin' by!
~Shelly
Subscribe to:
Posts (Atom)


